

Hootie
Hootie is Kualitee’s built-in AI assistant that handles the work between requirements and results. Point it at a requirement, a BRD, or a UI screenshot and it generates structured test cases in seconds. When you’re ready, Hootie executes them, updates statuses in real time, and logs defects with full context. It also reviews your test case coverage against requirements and flags what’s affected when a requirement changes.
With Kualitee’s AI Feature, you input your requirements and test scenarios in both textual, image or UI, and it instantly generates detailed test cases in Gherkin and textual form.
Hootie Copilot
Point Hootie at any URL, describe your workflow, and let it generate, validate, and execute test cases. End-to-end.
How to use Hootie Copilot
The full flow takes you from a URL to Pass/Fail results in six steps. Each step tells you exactly what to click and what to enter.
- From the left sidebar, click “Hootie Copilot.”
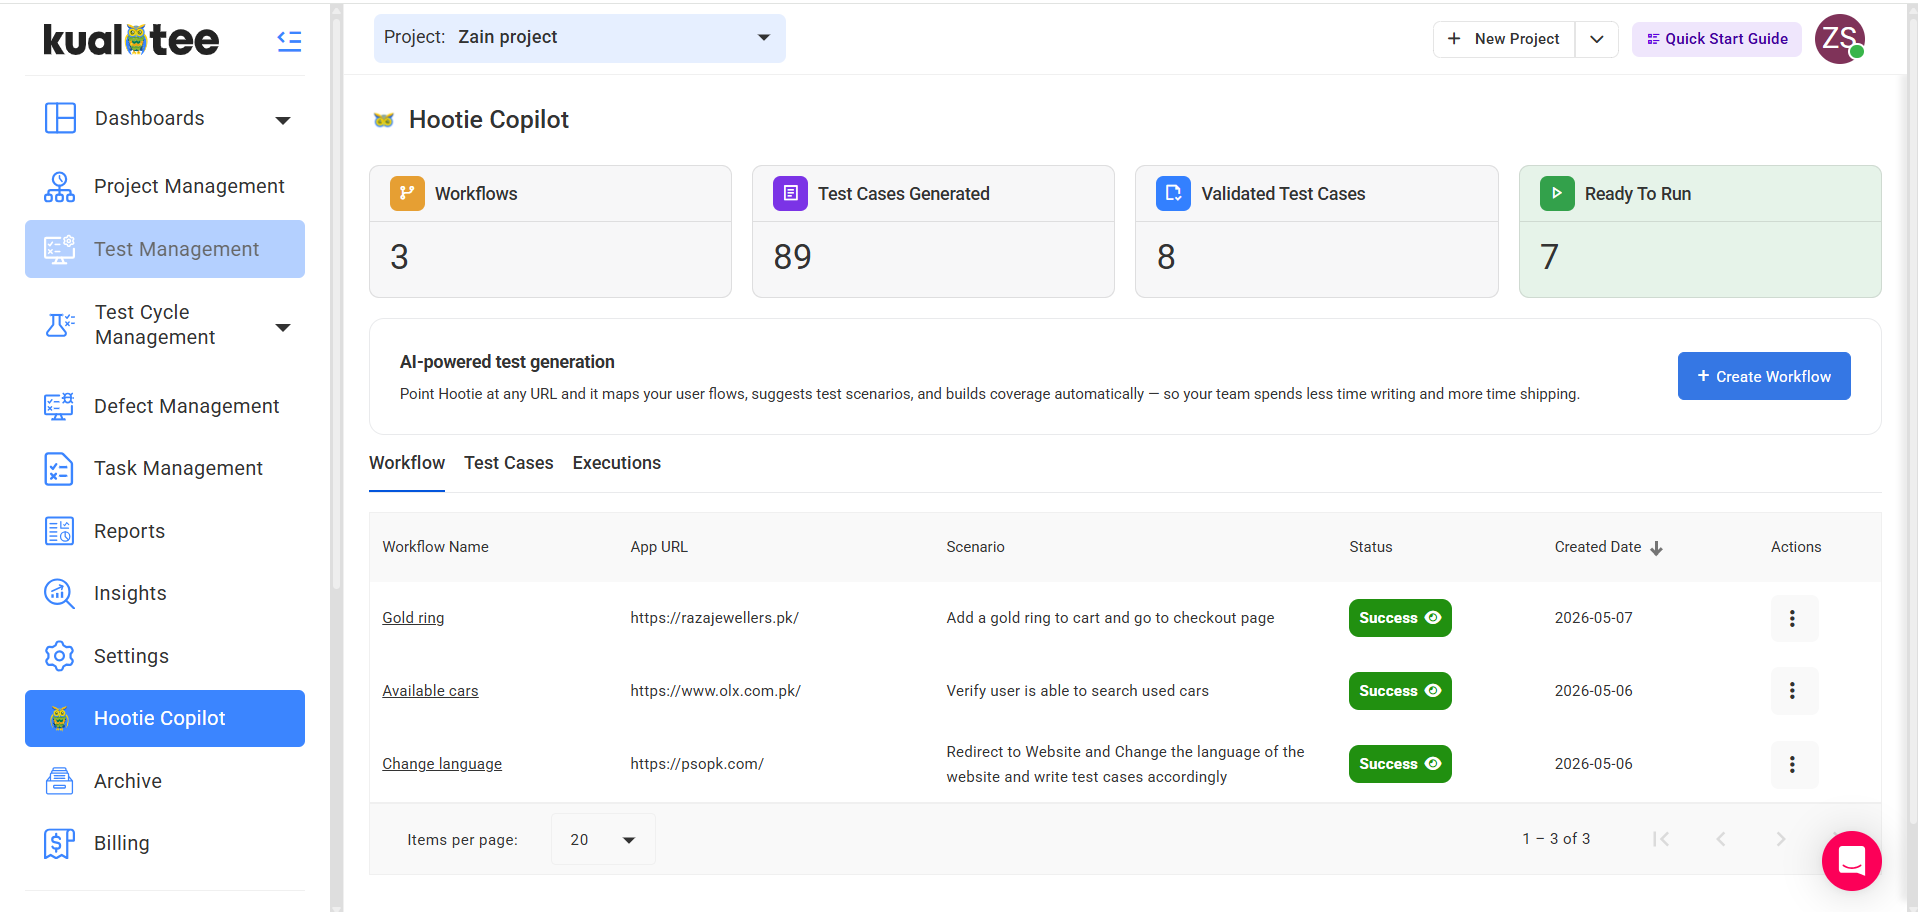
- The Hootie Copilot dashboard opens. At the top, you'll see four counters: “Workflows,” “Test Cases Generated,” “Validated Test Cases,” and “Ready To Run.”
- Click the “+ Create Workflow” button (top-right) to start.
A workflow form slides in from the right. Fill in each field:
- “Workflow” form appears: Enter the Workflow Name
- “App URL”: the page Hootie should test against (e.g., https://www.example.com).
- “No of test cases using AI”: how many cases you want AI to generate (e.g., 20).
- “Scenario for Test Case Generation”: describe the user flow you want covered (e.g., “Add a gold ring to cart and proceed to the checkout page”).
- Under “Environment,” pick a “Browser” (e.g. Chrome) and “Operating System” (e.g. Windows).
- If your app requires a login, add the “Credentials” so Hootie can sign in.

- Once Hootie finishes, your workflow appears in the Workflow list with a status indicator.
- Click the “Success” icon next to the workflow row to open the Test Case Insights view.
- Review the breakdown by category: “Positive,” “Negative,” and “Edge.”
- Tick the cases you want to keep, then click “Import Test Cases.”

- Click the “Test Cases” tab. All imported cases are listed here with their current 'Validation State'.
- To validate test cases, click "Actions" and select the Validate icon. Alternatively, click directly on the validation status to begin validation.
- Hootie checks each case for structure, clarity, and execution readiness. Validated cases show a “Success” status. Cases that need attention are flagged so you can fix them before running.

- Switch to the “Executions” tab. All successfully validated cases appear here as ready to run.
- Select the cases you want to execute.
- Click “+ Add Test Cases To Cycle” (bottom-right) to assign them to a Hootie cycle.

- In the left sidebar, click “Test Cycle Management.” Your Hootie Copilot cycle appears in the list (named with a timestamp, e.g., hootie_copilot_2026-05-07_12:09:14).
- Open the cycle.
- Click “Execute” (or the equivalent run action). Hootie runs each case against your application URL and marks each one “Passed” or “Failed” in real time.

Generate Automation Scripts for Your Manual Test Cases Using Hootie Copilot
Hootie Copilot can now convert your manual test cases into ready-to-use automation scripts. Right inside Kualitee.
Pick your framework, pick your language, and Hootie generates the script for you.
From the left sidebar, click AI Copilot – Hootie and navigate to the Executions tab. You'll see a list of all validated test cases that are ready for execution.
Locate the test case you want to automate and click the three-dot Actions menu (⋮) on the right side of that row.

A Generate Script panel will slide open. It displays the test case name, summary, detailed steps, and expected result for reference.
Select your preferred Framework (e.g., Playwright) and Programming Language (e.g., Python) from the dropdown menus.
Once done, click + Save & Generate.

Hootie will process the test case and generate the script. A Preview will appear showing the fully generated automation script file, named after the test case (e.g., test_add_to_cart.py).
You can review the code directly in the preview window. Click Download to save the script file locally.

All generated scripts are saved and accessible from the Generated Script panel.
Each script appears as a file icon labelled with the test case name. Click any script to preview or download it anytime.

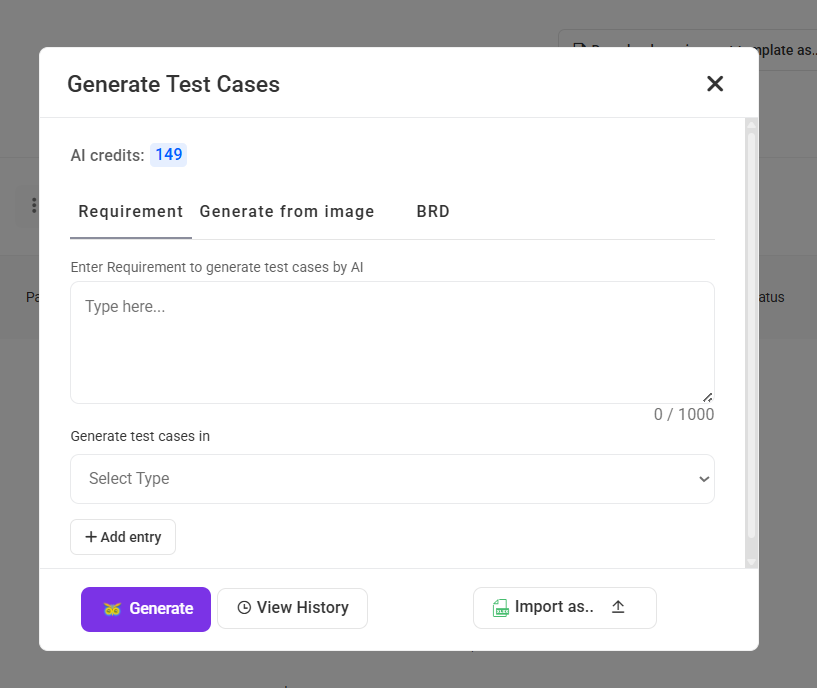
Creating Test Cases with Requirements
Provide your requirements and test scenarios. All you have to do is input your requirement, select the test case generation type or import your requirement sheet and click on Generate button.
Let AI do the work! The AI engine analyzes your input and generates a set of test cases.

Review the generated test cases, make any adjustments needed, and import them directly into your project.

Creating Test Cases Using Image/UI
Select the option “Generate from image”.

After uploading the image, select the type you want gherkins or textual.

Click on the “Generate” button and your test cases will start generating.

Test cases have been generated, review the test cases adjust accordingly. Import the test cases directly into your project.

Generate Test Cases Directly with BRD
Hootie is able to create test cases directly with your business requirement document. There’s no need to add the requirements one by one manually.
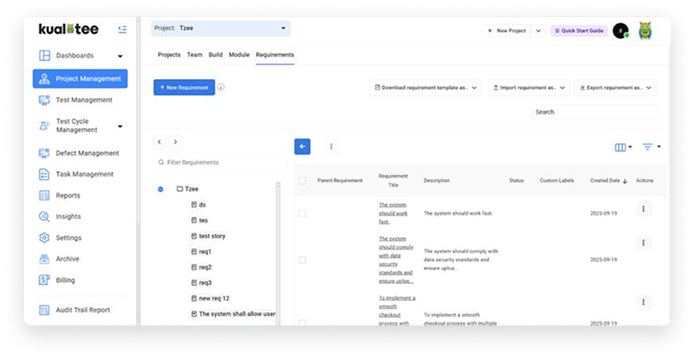
Open the project management tab and go to the ‘Requirements’ section. Once you’re there, click on ‘Generate Test Cases.’
The test case generation window will have 3 tabs. Click on the BRD one, and you’ll see the option to upload your requirements document along with the format for test case generation.
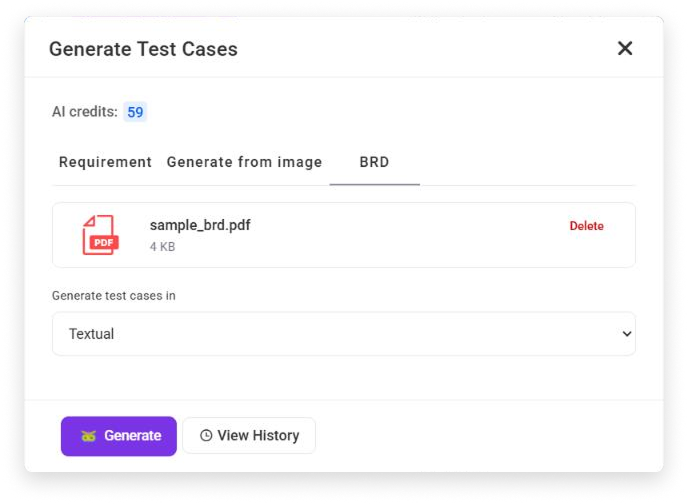
Now, drag and drop or choose your business requirements document in the PDF format. Then, select the type of test cases (Textual or Gherkins) that you want to generate from the dropdown menu.

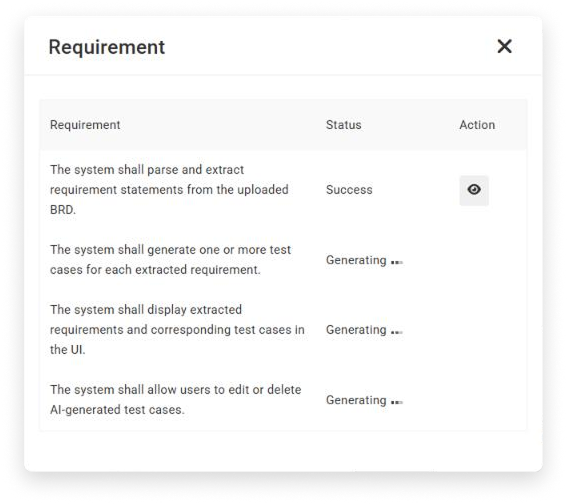
Once the parameters are entered, hit the ‘Generate’ button and wait for Hootie to process and extract the requirements from the BRD.
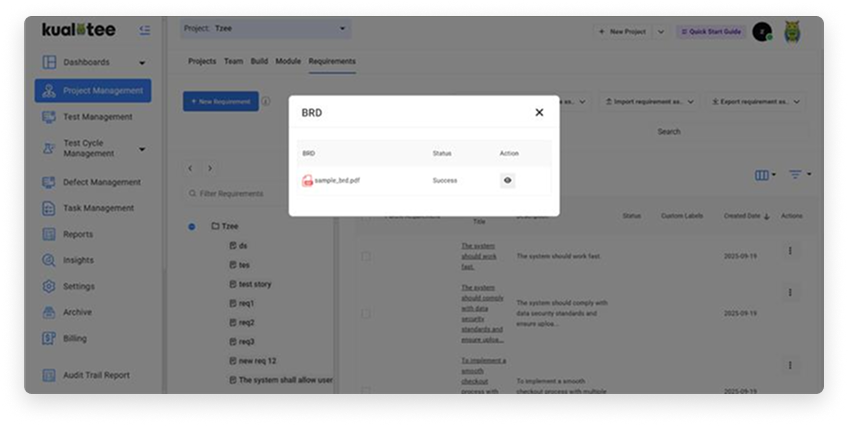
While this is happening, you’ll see the Hootie icon blinking in the top right corner, which indicates the process is still running. When the blinking stops, click on the Hootie icon.
Clicking on the Hootie icon will pop up a new screen. Here, you’ll see a view button in front of the BRD that you chose to upload earlier. Press it.
The requirements that were extracted from your BRD will be shown in the form of a list. From this list, simply select the requirements for which you want test cases to be generated for and click the ‘Generate Test Cases’ button.
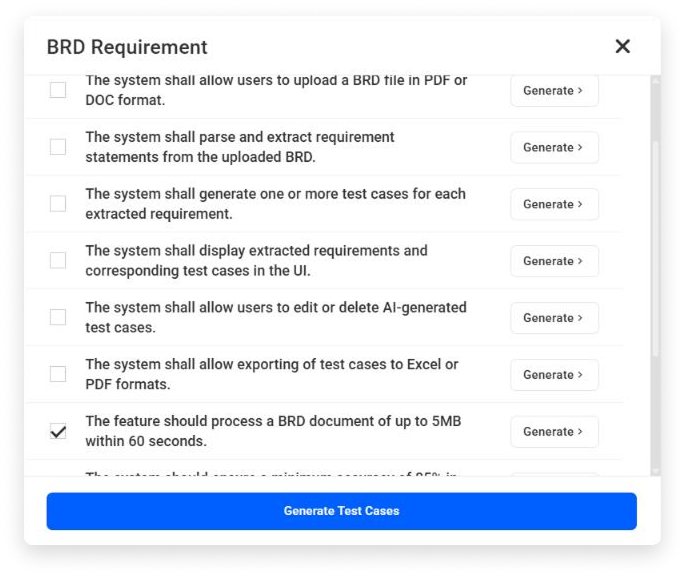
Finally, the test cases will start generating against the chosen requirements. Wait a couple of seconds and click on the view button to review the cases.
Execute Test Cases with Hootie
You can now run your test cases with AI! Once a test case finishes, its status will automatically update. If it fails, we'll log a defect and even attach relevant details directly to the test case for you.
Hootie Beta: Where your insights make the difference.
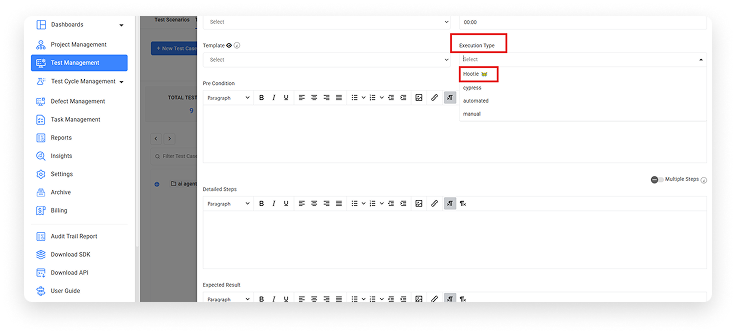
Give your feedback- Navigate to the test case creation screen.
- Enter a test case name and summary.
- Select "Hootie" as the "Execution Type."
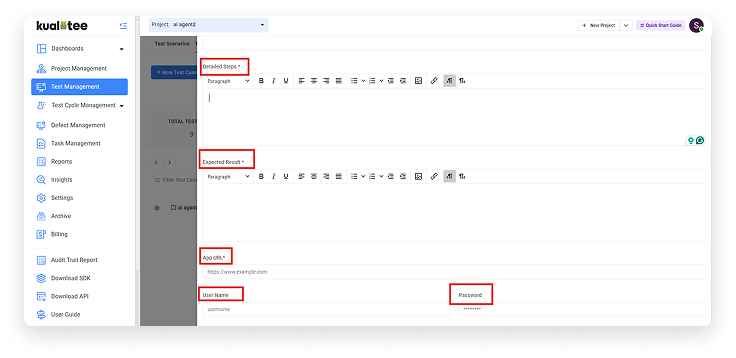
Note: When "Hootie" is selected, the "detail steps" and "expected results" fields become mandatory. Additionally, "APP URL," "username," and "password" fields will appear, requiring input.
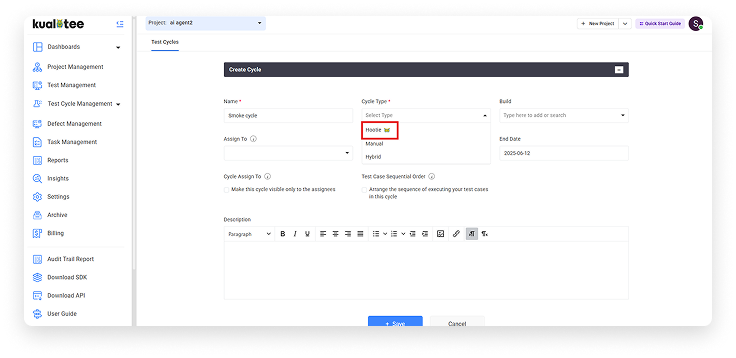
After defining your test cases with complete details, go to Test Cycle management >> Test cycles section.
- Click on "Create New Cycle."
- Select "Hootie" as the cycle type and fill in all mandatory fields to create the cycle.
- Add your test cases to the newly created cycle.
- Navigate back to the cycle listing screen.
- Click on the Actions button.
Select the Hootie icon to initiate AI-powered execution of the entire cycle.
After execution, the status of each test case will be marked.
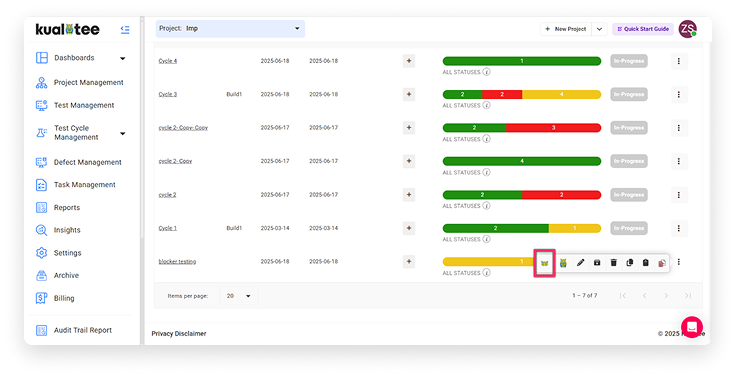
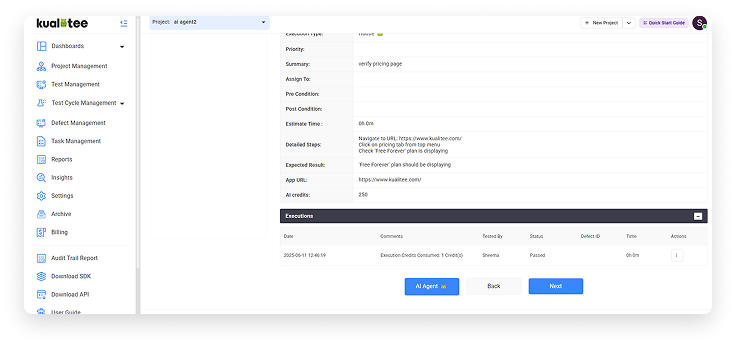
Click on the cycle name to navigate to the execution listing screen.
Click on the play icon to view the test case execution screen, where you can see the complete status, history, and information regarding consumed credits. If a test case fails, a defect will be logged, and an attachment will be added to the relevant test case.
Test Case Coverage by Hootie
Go to Requirements and click the Actions button.
Select the “test case coverage review by Hootie”.

A pop-up will appear for credit consumption confirmation.
Click on the confirm button on it.

To see the reviewed data, click on the reviewed coverage by Hootie button.

Now, the user can view both the missing and existing test cases.

The user can view details by clicking on the view icon next to every test case or by selecting all test cases and clicking on the View details button.

To download these test cases, select and click on the import test cases button.

Requirement Impact Analysis with Hootie
Edit an existing requirement. Once your requirement is updated, navigate to the Actions button.

Click on the Actions menu and select the newly appeared Impact Analysis button.

Let Hootie do the analysis! The system will instantly tell you exactly which test cases attached to that specific requirement are impacted by your recent edit.


Review the affected test cases. You can choose to use the Auto Heal feature to let AI seamlessly update them for you, or you can manually edit those test cases to align with your new requirement.

Our system follows a credit-based model, where credits are consumed when using AI agents such as test case generation and execution.
All-inclusive pricing for the available credit bundles.- Upto 250 Test Cases Generation
- Upto 200 Test Cases Execution
- Upto 500 Test Cases Generation
- Upto 450 Test Cases Execution
- Upto 1000 Test Cases Generation
- Upto 950 Test Cases Execution
Benefits of AI-powered test case generation
Say goodbye to tedious manual tasks and give your attention to high-level testing strategies
AI reduces the risk of human error, ensuring thorough test coverage
Test cases will be generated promptly, speeding up your testing process
Spend less time writing and more time testing, maximizing your team’s output and being more productive