Your QA engineers spend 30 to 60 percent of their sprint writing test cases. Not running them. Not analyzing results. Just writing. Steps, expected results, edge cases, variations. All for features someone already described in a requirement doc or a Jira ticket.
That’s the bottleneck nobody brings up in retros.
Most test management platforms have noticed this. TestRail, Qase, and others now offer AI-assisted generation. But the real question is: What does the AI actually do inside each tool, and where does the workflow stop?
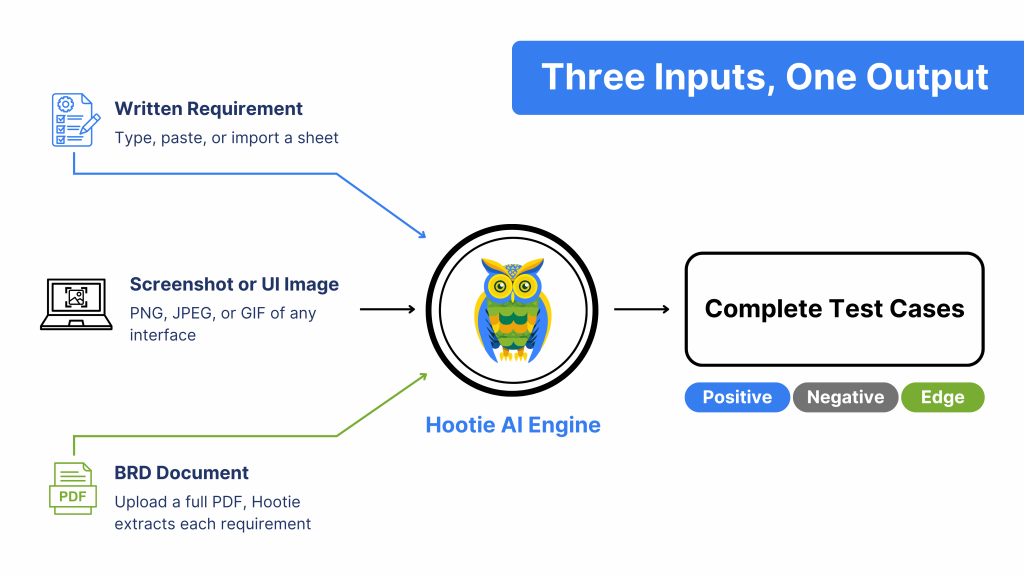
We built Hootie, the AI engine inside Kualitee, to go past generating titles from a text prompt. It reads requirements, screenshots and full BRD documents.
Not only that, it returns complete test cases with steps, expected results, and coverage across positive, negative, and edge scenarios. And if you want, it executes them against your live app and logs the defects.
No other test management platform does that full loop right now.
Three Ways to Generate Test Cases
Every AI test case generator starts the same way: paste a requirement, get cases. That’s table stakes. The real gap shows up when your input isn’t a clean one-liner.
1. From a Written Requirement
Open ‘Test Management’, click ‘Generate Test Cases’, and type or paste your requirement.
Then, pick the output format (Textual or Gherkin), hit ‘Generate’, and Hootie returns cases with summaries, steps, and expected results.
You can also import a full sheet of requirements and generate them in bulk. The output is sorted into three categories:
- Positive cases that validate the expected behavior
- Negative cases that test what should fail
- Edge cases that cover the unusual paths most teams miss
Review them, edit what needs fixing, and import directly into your project. There’s a Re-generate button if the first pass missed the mark.
2. From a Screenshot or UI Image
This is where the gap between Kualitee and everyone else shows up.
Switch to the Generate from Image tab. Drag and drop a screenshot of your UI (PNG, JPEG, or GIF). Pick Textual or Gherkin. Hit ‘Generate’.
Hootie reads the interface elements in the image and builds cases around them. For example:
- Upload a dashboard screenshot and you get cases for chart interactivity, data accuracy, responsiveness, and color contrast.
- Upload a login screen and you get cases for valid credentials, invalid credentials, session timeout, MFA, and concurrent sessions.
No other test management platform accepts a screenshot as input. TestRail and Qase both need text. If your product team hands you a Figma export and says, “write cases for this,” you have to interpret that image and type it out before any AI can help.
Hootie skips that step.
3. From a Full BRD Document
The third option saves the most time on large projects. Upload your BRD as a PDF. Hootie parses the entire document, extracts each requirement into a list, and lets you pick which ones to generate cases for.
This matters because most enterprise QA teams don’t get neat user stories. They get a 40-page PDF from the business team. Hootie handles the decomposition. You go from a raw document to per-requirement test cases without re-typing anything.
Kualitee’s free tier gives you enough credits to test all three input methods on a real project.
Generation Is Step One. Execution Is Where It Gets Real.
Most AI features in test management tools stop at generation. You get cases, review them, add them to your suite. Then you execute the old way.
Hootie keeps going.
Select “Hootie” as the execution type, provide the app URL and credentials, and Hootie runs the cases against your live environment. Here’s what happens:
- Each case is marked Passed or Failed in real time
- Failed cases get a defect logged automatically
- Relevant details are attached to the test case
- You get full status, execution history, and credit usage per case
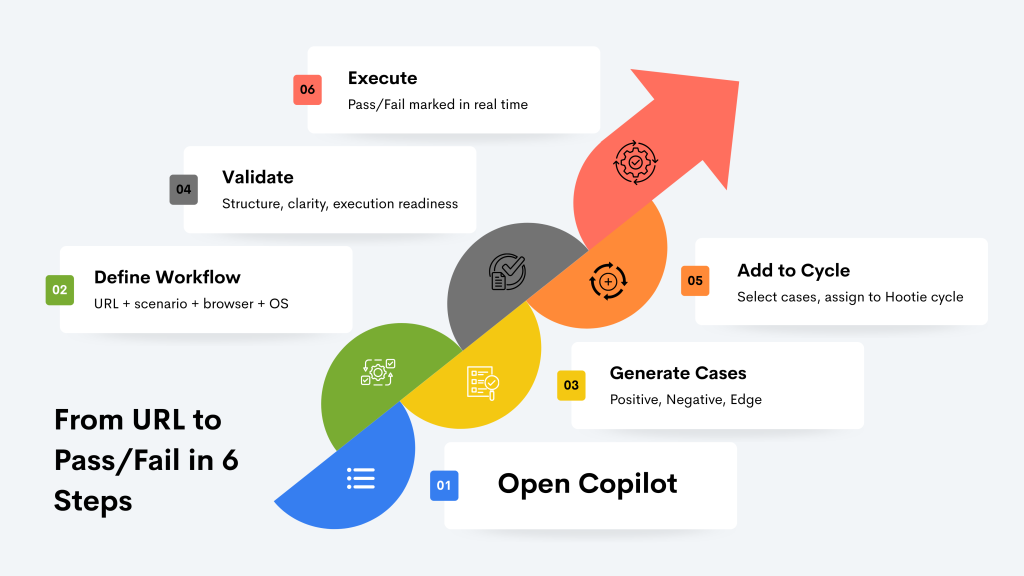
The Hootie Copilot
Copilot takes it further. You just have to:
- Point it at a URL
- Describe the workflow (like “Add a gold ring to cart and go to checkout”)
- Pick a browser and OS
- Hit Save.
Hootie generates the cases, validates them for structure and clarity, and executes the full cycle. URL to Pass/Fail in six steps. No switching tools. No spreadsheets.
See exactly how the six-step Copilot flow works, with screenshots for every step.
Two Features Competitors Don’t Have Yet
Generating and executing test cases is the core loop. But two things that break that loop in practice are gaps you don’t know about and requirements that change after the cases are written.
Hootie handles both.
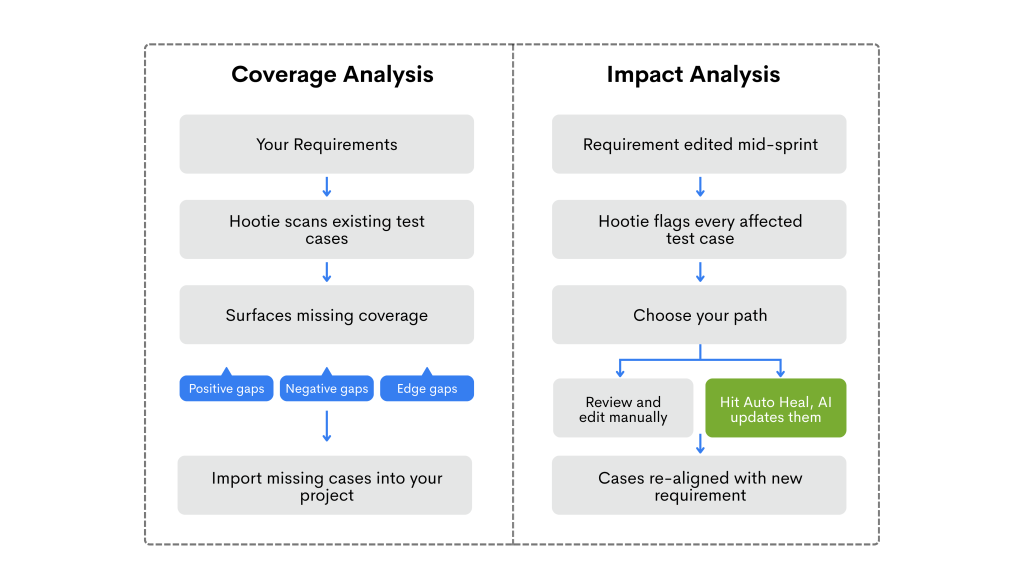
Test Case Coverage Analysis
Go to the Requirements tab inside Project Management, click Actions, and select “Review Test Case Coverage Using Hootie.”
The AI checks your existing cases against each requirement and tells you what’s missing.
This isn’t a percentage on a dashboard. It’s a concrete list of cases that should exist but don’t. For QA leads preparing for a release sign-off, it answers “are we covered?” without a manual audit.
Requirement Impact Analysis with Auto Heal
Requirements change mid-sprint. That’s not news. The question is: What happens to the 30 cases linked to a requirement that just got rewritten?
In Kualitee, you can edit a requirement and run Impact Analysis. Hootie identifies every affected case.
You can then review them yourself or hit ‘Auto Heal’ and let AI do the heavy lifting. It beats the usual alternative: discovering broken tests weeks down the line and burning a whole day trying to fix them.
AI generation is one of 18 features built into the platform.
How This Stacks Up Against TestRail and Qase
Both tools have shipped AI features in the last year. Here’s where things stand as of mid-2026:
| Capability | TestRail | Qase (AIDEN) | Kualitee (Hootie) |
| Generate from text requirements | Yes | Yes | Yes |
| Generate from screenshot / UI | No | No | Yes |
| Generate from BRD (PDF) | No | No | Yes |
| Textual + Gherkin output | Yes | Yes | Yes |
| AI test execution | No (Scripting only) | Yes (Cloud-based) | Yes (Built-in) |
| Copilot features | No (Human-in-the-loop) | Yes (Self-healing & browser guide) | Yes (Hootie Copilot workflows) |
| Coverage gap analysis | No | No | Yes |
| Requirement impact analysis | No | No | Yes |
| Auto Heal on req change | No | Yes (Selector/test self-healing) | Yes (Auto Heal feature) |
| Credit pricing structure | N/A (Bundled into subscription) | $0.40 / credit (Flat overage rate) | $0.10–$0.12 / credit (Prepaid bundles) |
TestRail generates from text and recently added automation code generation from existing manual cases. But it stops there. No image input, no BRD upload, no AI execution.
Furthermore, Qase’s AIDEN generates from requirements and Jira issues, converts manual to automated, and executes in the cloud. This is closest to Hootie’s loop. But no image or BRD input, no coverage gap analysis, no impact analysis. And their credit overages run $0.40 each. Kualitee’s bundles are $0.10 to $0.12 per credit.
What 50 to 60 Percent Time Savings Looks Like in Practice
We won’t pretend there’s a formal study behind this number. What we have is consistent feedback from teams using Hootie: time spent creating test cases drops by roughly half.
Think about the current workflow for a single requirement:
- Read and interpret the requirement
- Open the test management tool
- Write 8 to 15 cases with steps and expected results
- Think through edge cases
- Get peer review or approval

That takes 30 minutes to two hours, depending on complexity.
With Hootie, the engineer pastes the requirement (or uploads a BRD, or drops a screenshot), gets a draft in seconds, reviews and edits, and imports the final set.
The thinking still happens. The review still happens. The typing doesn’t.
Try It
Kualitee has a free tier. Hootie AI credit bundles start at $30 for 250 credits, which is enough for up to 250 generated cases or 200 executed ones. If your team is still writing every case from scratch, the math is simple: compare the hours spent writing to the cost of a credit bundle.
Sign up at Kualitee and generate your first AI test cases in under five minutes.